I hope that I'm able to pass along a little bit of my experience (both good and bad) with all of you, so that you can become "bakers" too! I realize that rhymes...so maybe I should also call myself a poet? Or just claim that I am pretty much as good as Dr. Suess...we'll see where that goes!
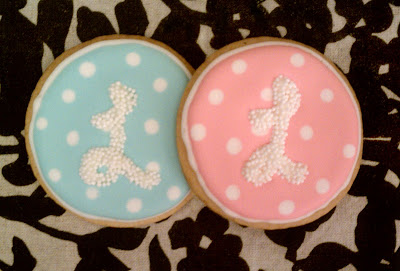
I want to start out by sharing my favorite cookie with you. I have to give credit for this idea to one of my favorite blogs, Bakeat350.blogspot.com. This is the cookie that started it all for me....it's so pretty, and happy looking. Yep, food can officially look happy! Especially when it has tons of sugar, bright colors, my initial, and polka dots. I love polka dots, I think I'm borderline obsessed with them...that might be a problem actually. Oh well, I'll deal with that later.
I'll be sharing my favorite sugar cookie recipe along with tips for royal icing in later posts, but for now let's pretend like you know all that already!
MONOGRAM-DOTS

The great part about these cookies is that you can use any shape you want!
Before you start decorating your cookies, make the letters. I use Wilton white chocolate melts and white nonpareils (fancy term for little while sprinkles). Melt a small handful of white chocolate melts for about 30-45 seconds in an unlocked ziploc bag. Once they are melted, snip a small corner off so you can pipe out some letters. Use a cookie sheet covered with wax paper, and pipe out your letter right onto the wax paper. When the chocolate is still wet pour some sprinkles on top until it's completely covered. Once you have as many letters as you need, stick the pan in the freezer for a few minutes to set. Once they have set they will just peel right off the wax paper and are ready to use!

Outline your cookie with stiff royal icing. Let the outline dry for a few minutes before you flood it.
Next, flood the inside of the cookie with your background color icing, and spread it out to the edges using a toothpick. While the flood icing is still wet, use the wet on wet technique to drop little drops of a contrast color (I was super exciting and used white) for the flat polka dots.
I like to let the polka dots sit for a minute or two before I drop on my monogram letter. That's it! Seriously...just pick up your letter (carefully, they do break sometimes..) and drop it right in the center of the cookie.
The cookies will need to dry overnight, but there's no law against eating one immediately (if there is i am in serious trouble)!

That's it!, you've now graduated to professional cookie decorater in my eyes, and I'm sure that counts for a lot, right?! :)